Editing Concert Photos - Working With Saturated Blues
Last year, I did a tutorial on tweaking colors and saving skin tones when editing concert photos and got a lot of feedback about it, meant to do some more tutorials, then got busy and completely forgot about it, haha. With the extra time that I’ve had on my hands while I’m stuck at home, I’ve been revisiting and re-editing some older photos and figured that it would be fun to do a few more of these posts.
Working With Saturated Blues
Let me preface this by saying that there is absolutely no right or wrong way to edit a photo. Every photographer has their own unique shooting and editing style, and that’s what makes their work stand out. For these saturated blue shots, this is just my way of editing to get the look that is consistent with the rest of my work. I’ve had a few people ask for advice when it comes to editing heavily saturated blues and reds, so I figured I’d share what my workflow looks like.
Blues and reds can be a bit challenging to work with, as most of you probably already know. Especially when the front and back lighting is just one highly saturated color, it can definitely make the photo look really flat and hard to work with, and I’ll be completely honest, I probably never edit two blue photos the same exact way. The tones of the blue, key lights and the brightness of the lights can make a huge difference, and each photo can call for a different editing technique. (Or you can always get frustrated like me and go, “Fuck it, black and white!” There’s definitely nothing wrong with that, haha.)
For some heavily saturated blue photos, I went back and chose three photos from Sylvan Esso at Red Rocks in 2018 to rework. Their lights made these photos really interesting and fun to edit. Although the blues were really saturated, there were some white lights in the mix that actually made editing really fun.
A walkthrough of these three re-edits can be seen below
All RAW images below can be downloaded here. You’re welcome to edit them yourselves and share them with me on Twitter (@shanphotomaker). I’d love to see your take!
Bringing Back Skin Tones and Avoiding Blowouts

Camera Calibration, White Balance and Exposure
My editing workflow is almost never identical with every single photo, but for the most part, I usually start off by adjusting the camera calibration and basic settings like white balance, exposure and contrast. For this shot in particular, I started off with camera calibration to get a bit of the whites back in the lights, then moved onto adjusting the exposure and contrast because the photo looked a little flat.
I also go back to camera calibration multiple times throughout the editing process to re-adjust. (I specifically didn’t make a video tutorial for this reason cause I feel like it’s a little annoying and all over the place, haha). But yeah, definitely don’t be afraid to adjust then re-adjust these settings - it can make a huge difference.
I personally prefer images that include the whitest whites and darkest shadows, so I went with a higher contrast look to make this one pop a bit more. This was done in both the basic settings above and within curves.


Split Toning
I really rely on split toning when it comes to editing photos like these ones. It really makes a huge difference and helps to bring back skin tones without giving the imagine an over-edited, artificial look. For this shot in particular, I brought back her skin tone using yellow/green in the shadows and attempted to keep the lights looking clean and consistent with the blue/purple in the highlights. When editing this picture in particular, I really wanted to keep the colors complimentary and pleasing to look at, and felt that the red/pink shadows and blue/teal highlights looked really nice together.
Graduated filters used to create a hazy, dreamy look and more uniform colors
Graduated and Radial Filters and Fixing Blowouts
Radial filters used to help even out highlights and fix small blowouts
This is definitely my favorite part of my workflow. I usually end up tweaking my photos a lot using the the graduated and radial filters in Lightroom. It’s really beneficial when spot editing or trying to manipulate a specific area of the image without affecting everything else.
For this photo in particular, I used a graduated filter to get rid of the vignetting in the top left corner and make the color just look a little more uniform and consistent - I’ll usually do this by bringing dehaze and clarity down and adding some additional color. Definitely be careful when doing this - a little bit of the dehaze tool goes a LONG way, and overusing it can make the photo look really funky. I also hit the bottom half of the photo with this to give it a softer, dreamier look.
You’ll also notice that using these filters can help highlights look a lot softer or less blown out. Every photo and every light is obviously going to be different, but what I’ll usually do to achieve this look is hit it with a radial filter to bring up the highlights, bring down the whites and pull down the dehaze. I know it might be a little hard to see in these screen-shots, but if you click on them, you can zoom in on the settings as well!


Using Complimentary Colors and Getting Rid of Annoying Objects

White Balance, then Camera Calibration
I loooooved working on this photo because it’s insanely rewarding to be able to successfully edit something that’s so dark and saturated with just one color. Right away, my goal was to get rid of these dark blues and make the saturated highlights really glow, so I started off by trying to bring back some of the other colors in the photo with white balance, then messing with the camera calibration a little bit. Like I said above, my workflow is rarely identical, even with photos from the same show, and for this one in particular, that meant messing with the white balance and exposure, then camera calibration. I’ll also say, it becomes a lot easier to edit when the photos all have similar lighting, because you’ll know what to do to manipulate it.
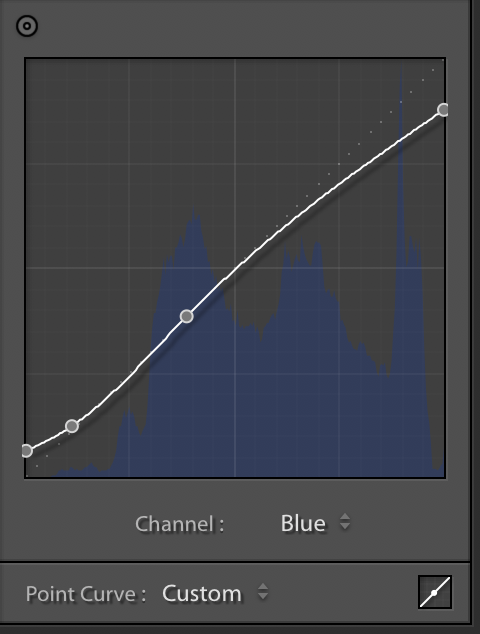
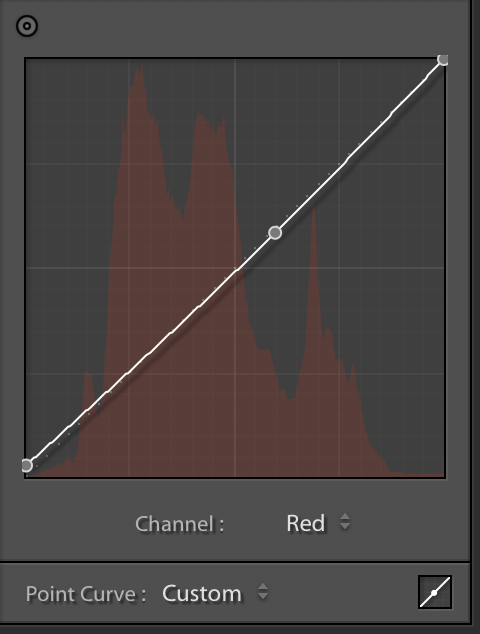
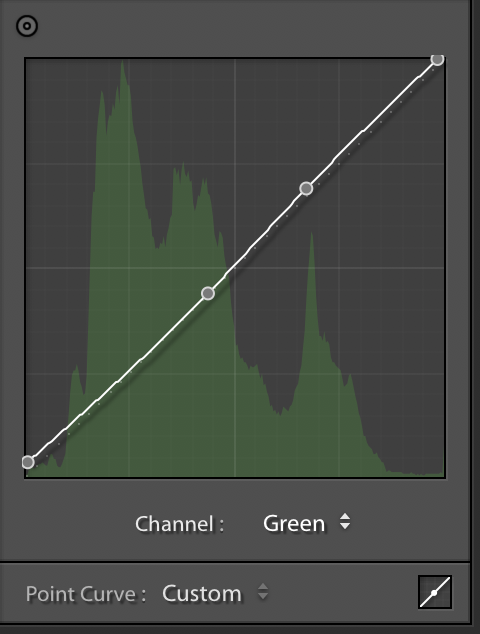
Curves and Complimentary Colors
For this shot in particular, it would have made a lot of sense to keep the pretty teal/blue highlights, but I really wanted to bring in some contrast by using complimentary colors - in this case, that meant balancing the purples with some soft yellows. I started doing this by introducing the yellows in the highlights using curves. I also brought down my highlights in curves to create a softer look.
Split Toning, Filters & HSL Sliders
I spent probably way too long messing around with the split toning on this image. At first, I settled on bringing some subtle yellows into both the highlights and shadows, but it didn’t quite give me the look I was going for. So after some more tweaking, I ended up finding a really pleasing look with some saturated yellows in the shadows and greens in the highlights. You’ll notice in the second photo I also brought the blue luminance up quite a bit, which brought some more brightness to the lights on the right hand side. It isn’t pictured, but I also used a radial filter there to help smooth it out a bit and a graduated filter on the left side to darken the shadows a little.
Getting rid of that annoying fan…
Obviously, this part is TOTALLY optional, but I absolutely hated the fan in the bottom right corner of the photo. Back when I shot this in 2018, I wasn’t really paying attention to the way it was composed and definitely would have shot it differently now, but oh well. I exported the photo and opened it in photoshop to get rid of the fan using the lasso tool and filling it with content aware. After that, I smoothed out the corner using the brush tool and clone stamp tool at a low opacity. Thankfully, it was a really small area that was already relatively hazy looking, so it made basic editing really easy. (I’ll be honest, I’m still not amazing at that kind of stuff, haha). While I was at it, I also cleaned up some distracting lights in the background. Definitely not necessary, but they were really bothering me.
Oh, and don’t forget to do this on a background copy layer in case you mess it up a few times like I did!


Recovering Skin Tones

You know what the first step is at this point…
I have a love-hate relationship with photos like this one. I’m really happy with the sharpness on her face and the moment captured, but I really hate that there’s not a whole lot to work with as far as highlights and shadows and lights go. I decided to focus on bringing skin tones back for this one, which proved to be really fun, though! Like the first two photos above, the first steps were messing with the white balance and camera calibration.
Curves go a long way


For photos like this one, curves go a long way when it comes to introducing warmer colors and skin tones while still keeping some of the integrity of the original cool colors in the shadows and background. Curves are also really helpful when trying to add some contrast.
Split Toning and Extras
Like curves, split toning is also really helpful when introducing new colors! I kept things warm with this shot again like the others above.
After this, I also noticed that there was some weird banding in the photo. I shot this one a little too fast, which can create the banding of color that you can see in the bottom third of the photo. I felt like it was a little distracting, so I actually went back and hit it with some filters to match the rest of the photo and make it look a little more uniform. While I was doing that, I also got a little nit-picky with the blue shadows on her nose and hand, and messed with those as well. Again, this isn’t really necessary, but it was kind of bothering me, haha. You can see those changes in the finished photo below.


ALL RAW IMAGES ABOVE CAN BE DOWNLOADED HERE.
Please feel free to edit these yourselves - be sure to tag me on Twitter! I’d love to see your takes on them. Like I said above, these edits are just my personal preference and are definitely not the be-all-end-all, but I hope it helps a little bit when you’re working with heavily saturated blue photos.